We’ve just posted the M1 build of 3.2.0 onto the Eclipse Download Site. M1 is the first drop of the 3.2 release and it has concentrated on the key task of upgrading up to the Spring 3 libraries. This of course is in itself a pretty big task, and so we wanted to conduct that upgrade in isolation before starting to add actual new features into the release.
Now, as you can imagine, because Spring forms such a core part of the infrastructure there is a knock on effect for plugins. So for thie M1 release we’ve also upgraded 22 of the most popupular plugins that experienced issues with the new libraries (For the list, see here) . In order to keep the new and old versions of the plugins distinct we’re using a new update center (http://hudson-ci.org/PluginCentral/site/3.2/) for this release.
At this stage, any testing of 3.2 that you do should concentrate on issues such as upgrade and plugin compatibility . Feedback via BugZilla and the forum as per normal.
We’re currently planning the 3.2.0 release and would welcome feedback as to must-have features that you’d like to see in that release. If you have any ideas just add them to the thread on the Eclipse Forum: http://www.eclipse.org/forums/index.php/t/664796/
A quick review of the latest Hudson ping back stats to the update center and download numbers shows that there has been a gratifyingly large uptake of Hudson 3 of various versions, with over 45,000 downloads of the official 3.0.0 and 3.0.1 distributions from Eclipse alone (That’s the bare Hudson Core, I’ve not included the bundled-war download figures in that). However, this is just half of the story. We know from the ping-backs to the plugin center that there are still more than 20,000 active Hudson 2.n servers out there (and, I fear, a few thousand still on 1.n!)
So with Hudson 3.1.0 just around the corner why don’t you have a quick look in that dusty cupboard and see if your vital Continuous Integration / Delivery infrastructure could do with an upgrade. With the memory consumption improvements in 3.1.0 your servers might just thank you…
In the last article in this series I looked at the basics of setting up and using the new Hudson 3.1.0 Team Concept feature (Using Hudson Teams, Part 1 – The Basics). In that article I dealt with the simple case of mapping users into teams, based around Hudson’s own internal user store. Now that approach is all very well with a small team to deal with, but once you move up to mid-sized and enterprise organizations it stops being very usable. The problem is, of course, one of the scale of user management; you simply don’t want to have to deal with the mechanics of dealing with hundreds of individual users through Hudson’s web user interface.
The other thing to consider, is that within a single company or organization you may conceptually already have organization units or roles already defined within your global identity store. These existing roles may already contain the mapping of users that you need, and you have no desire to duplicate all of that work within Hudson.
The good news is, that the Team feature in Hudson, not only allows you to map users into teams but also Roles or Groups from any of the supported authentication providers as well.
To illustrate this I’ll take you through the basics of setting up an LDAP provider with some roles and then mapping those into the same teams I set up in Part 1.
Configuring LDAP
If you already have a suitable organization LDAP repository then you can go ahead and us that, however, for the sake of example here I’m setting a new one up. In this case I’ve used OpenLDAP from openldap.org. having installed this on my machine (OS/X in this case) it needs a little configuration to set it up to illustrate the feature.
For the purpose of this example I’ll be defining an LDAP repository with a root Distinguished Name (DN) of org.hudson-ci (dc=hudson-ci,dc=org). You’ll see this root expression repeated throughout.
The first step is to edit the /etc/openldap/ldap.conf and set the hostname and the base DN for local LDAP tools to use. In my case:
HOST 127.0.0.1
BASE dc=hudson-ci,dc=org
In a second I’ll configure the actual LDAP daemon process, but first I need to generate a password hash to use to configure the manager or root password for the instance. To do this you need to open a shell and run the slappasswd command:
bash$ slappasswd
New password:
Re-enter new password:
{SSHA}r8UxTFG1JSuPJ+eVCNPZGfxA9jIbMNYE
Copy the result (with the {SSHA} prefix) somewhere safe, we’ll need that in a moment.
Next you need to configure the LDAP daemon process through it’s configuration file slapd.conf. You’ll find a suitable example file to copy in the same /etc/openldap directory called slapd.conf.default which you should clone. In the daemon configuration file there are several sets of changes to make.
First of all, ensure that all of the required schemas are loaded. In the default sample, only the core schema will be specified, but you need to add two extras as well.
include /private/etc/openldap/schema/core.schema
include /private/etc/openldap/schema/cosine.schema
include /private/etc/openldap/schema/inetorgperson.schema
Having these schema’s loaded ensures that we can specify all of the attributes we need in our directory entries and specifically includes the uid property which is the default attribute which Hudson will use to identify a user.
Next within the slapd.conf you need to define the basic access control to attributes within the directory entries. In this case I’ve set things up so that Hudson can authenticate a user password without itself being authenticated with the LDAP server. Hudson does have the option to provide credentials to authenticate itself to LDAP as we’ll see, but that will depend on how your organization’s LDAP is configured.
Here’s the access rules I have defined in this testing instance:
access to attrs=userPassword
       by self write
       by anonymous auth
       by dn.base="cn=Manager,dc=hudson-ci,dc=org" write
       by * none
access to *
       by self write
       by dn.base="cn=Manager,dc=hudson-ci,dc=org" write
       by * read
The dn.base value above refers to the LDAP manager or root user identity, imaginatively called “Manager” in my case.
Finally the core DN configuration for the Server and the manager identity used above, and pasting in the hashed password value generated with the slappasswd command:
suffix "dc=hudson-ci,dc=org"
rootdn "cn=Manager,dc=hudson-ci,dc=org"
rootpw {SSHA}r8UxTFG1JSuPJ+eVCNPZGfxA9jIbMNYE
Apart from that, you can leave all the other defaults as they are.
Basic LDAP is now ready to run. Note that at this stage it is untuned, and probably very insecure; call in your friendly LDAP professional if you want to do anything more than just play around. The first time that you start it I recommend that you use the following command to check that the configuration is OK, the -d option will prevent it from forking and ensure that the output is visible to you as it starts up:
sudo /usr/Libexec/slapd -d Config
Now you can run a simple test using the ldapsearch command from another terminal window on the same box:
bash$ ldapsearch -x
# extended LDIF
#
# LDAPv3
# base <dc=hudson-ci,dc=org> (default) with scope subtree
# filter: (objectclass=*)
# requesting: ALL
#
# search result
search: 2
result: 32 No such object
# numResponses: 1
As the repository is empty the response is not very exciting.
Populating the Sample Repository
Now that LDAP is up and running we can start to create users and roles into it. The simplest way to do this is using the ldapadd command passing it an LDIF file which defines the structure.
An example of the ldapadd command is as follows:
ldapadd -x -W -D "cn=Manager,dc=hudson-ci,dc=org" -f /Users/hudson/ldap/sampleHudsonCIRepos.ldif
The -D parameter passes the identifier of the LDAP root user and -f specifies the ldif file to read from. When you run the command you will be prompted for the password you generated earlier and stored in hashed form in rootpw.
Here’s an excerpt from that file that sets up the initial structure:
dn: dc=hudson-ci,dc=org
objectclass: dcObject
objectclass: organization
o: Hudson Development
dc: hudson-ci
dn: ou=Roles,dc=hudson-ci,dc=org
objectClass: organizationalUnit
objectClass: top
ou: Roles

dn: ou=Committers,dc=hudson-ci,dc=org
objectClass: organizationalUnit
objectClass: top
ou: Committers
This defines the basic top level hudson-ci DN and then two organizationalUnits within that Roles and Committers. Next in the file I define several users. They all look like this with variations on actual names of course:
dn: cn=Duncan Mills,ou=Committers,dc=hudson-ci,dc=org
cn: Duncan Mills
sn: Mills
uid: duncan
userPassword: {SSHA}iVFtLeFqI84TEuDcj8VanYAtAwQMWxg9
objectClass: inetOrgPerson
You can see here that the DN of these entries includes the Committers organizationalUnit (ou=Committers) . Each person is defined as an inetOrgPerson which means that the LDAP record can include, along with many others, the uid attribute. Again I’ve used the slappasswd command to generate a hash for this user (via userPassword) as a convenience.
Finally we have an entry for each role we want to use, in this case three roles called BuildAdmin, Developer and QAEngineer.
dn: cn=BuildAdmin,ou=Roles,dc=hudson-ci,dc=org
cn: BuildAdmin
objectclass: groupOfUniqueNames
uniqueMember: cn=Hudson Admin,ou=Committers,dc=hudson-ci,dc=org

dn: cn=Developer,ou=Roles,dc=hudson-ci,dc=org
cn: Developer
objectclass: groupOfUniqueNames
uniqueMember: cn=Winston Prakash,ou=Committers,dc=hudson-ci,dc=org
uniqueMember: cn=Bob Foster,ou=Committers,dc=hudson-ci,dc=org
uniqueMember: cn=Duncan Mills,ou=Committers,dc=hudson-ci,dc=org

dn: cn=QAEngineer,ou=Roles,dc=hudson-ci,dc=org
cn: QAEngineer
objectclass: groupOfUniqueNames
uniqueMember: cn=Latha Amujuri,ou=Committers,dc=hudson-ci,dc=org
uniqueMember: cn=Bob Foster,ou=Committers,dc=hudson-ci,dc=org
These roles specify the DN of each of their members via the uniqueMember attribute,
Once the LDIF script has been run we can use a tool such as jxplorer to view and further manage the repository (as well as using the command line tools of course)

Logging onto my local repository

And expanded view of the repository.
So my small sample LDAP repository is now all set up and ready to go.
Enabling LDAP in Hudson
If you cast your mind back to Part 1 in this series you’ll understand exactly how to do this now. Navigate to the Hudson Security option and enable security, then select LDAP as the Security Realm:

You can see here I’ve specified a couple of bits of information other than the address of the server (which is a loopback to localhost in my case).and the Distinguished Name root for the server (dc=hudson-ci,dc=org). The first is the User Search Filter. This is filtering on the uid value that I defined with each record. Hence, to login to the server I’ll need to use my uid identity (duncan) as my username. Note that I could equally filter by some other LDAP attribute here such as email address. Secondly I’ve specified a Group Search Base. Now when Hudson is tying to match a role / group it knows to start the search in the LDAP hierachy at ou=Roles,dc=hudson-ci,dc=org.
Because of the access control rules that I specified in the slapd.config, there is no need for me to specify Manager credentials to connect to the repository.
Using Teams with LDAP
At this stage, if you’ve been following along, you should be able to log in as one of the users defined in your LDAP repository although we’ve not enabled any authorization yet (anyone can do anything). As in Part 1, I’ll go in and select Team based Authorization Strategy in the security Authorization section of the security page, and define a Super-Admin. In this case, rather than directly specifying the Hudson Admin user (admin) that I defined in LDAP I can use the Role that Admin belongs to – “BuildAdmin”.
To do this you convert the LDAP role name to all uppercase and prefix it with the string “ROLE_”. Thus, when prompted for the User or Group name for the System Admin I can supply the value “ROLE_BUILDADMIN”.

Saving that, I can now log in to Hudson using the uid “admin” which matches the Hudson Admin user and it’s LDAP userPassword. Because this user is allocated to the BuildAdmin group I’ll now be the Hudson team super-admin.
In the same way I can define the same teams as before (see Part 1) , Dev and QA, but this time, rather than adding individuals as members I can use the ‘ROLE_DEVELOPER” and “ROLE_QAENGINEER” values respectively, automatically enrolling the members of those roles into the relevant teams.
Note that using roles mapping is not an all-or-nothing thing. You are able to mix and match roles and users, so for example you may choose to explicitly nominate a team admin as a real user, but then the bulk of the team membership comes from the role(s), e.g.

So if I now log in to Hudson as duncan (a member of the Developer group/role) here is the list of jobs that I see:

I can see the read-only public job “Job1” and the Dev team specific job “Dev.BuildHudson” because the Developer role is assigned as a member of the Dev team in Hudson.
Of course, now that core membership of teams is defined through LDAP you no longer have to manage membership changes through Hudson. As a new developer joins your org and is enrolled in your corporate LDAP groups then they will automatically be able to access the relevant resources in Hudson – a great leap forward!
Although I’ve used LDAP to illustrate using simplified team management in Hudson, the same approach will apply with the other Security Realm types – Unix Users /Groups and the roles assigned to an authenticated user in your Java EE Servlet container.
We’ve just published a second (and hopefully final) release candidate for Hudson 3.1.0 . This release fixes some further bugs that were specifically thrown up during testing of RC1 and some others that were on the queue and we managed to squeeze in.
It also turned out that an extra JAR file (jsr305-1.3.9.jar) had crept into the distribution by mistake. This is a compile time dependency that should not have been pulled into the distro – it’s now removed.
Please have a further hack around with this version, we’re aiming to release 3.1.0 formally before the end of the month.
In this article I’ll be walking you through the basics of the new Hudson 3.1 feature “Team Concept”. As the name suggests, this feature takes Hudson from using a flat, granular, authorization model into one where users are assigned to one or more teams. The important thing here is that all of the jobs, owned by each team, are effectively sandboxed from each other and Hudson becomes a multi-tenant environment. This is great news for sites that want to host multiple development teams on a single Hudson instance but prevent them from viewing, editing, running or otherwise interfering with each others jobs. In the past you would have had to either stand up a Hudson instance per team, or define user permissions for each and every job using Job-based Matrix Authorization if you wanted to maintain such separation.
I’ll start off with a simple example of team use, just using Hudson’s own user database. In a following article I’ll show you how to use an LDAP server instead, which, as we’ll see will add an extra nifty feature to the mix.
If you want to follow along you’ll need Hudson 3.1.0 or above, intialized with the default set of plug-ins. In this case I’m starting from a completely empty, initialized Hudson instance with no security enabled. To help illustrate some features later on, I’ve created a single freestyle job called “Job1”, it does not matter what that job does, it’s the ability to see and run it that will become important later:

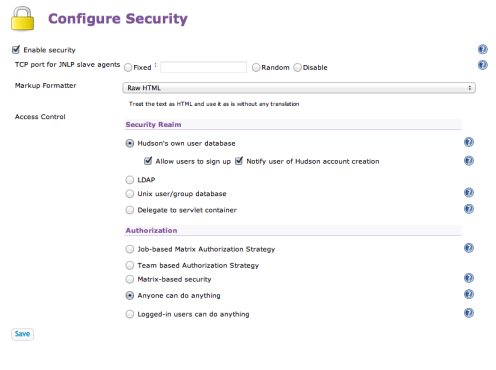
At this point, my Hudson instance is unsecured and wide open to anyone who can get to the URL. Lets’s fix that by going into the Manage Hudson option on the sidebar and choosing Configure Security from the list. This screen initially presents you with a simple choice:

So naturally enough I’ll choose to enable security using the checkbox. The screen will now expand and you’ll see the various security providers that you can plug in to secure Hudson. In the next article I’ll be using LDAP , but in this starter article I’ll just select Hudson’s own user database. With this security model, Hudson will manage the authorized users and, as you can see here, you can even allow users to self register. This mode is ideal for small development groups in a known and trusted environment and is sufficient to demonstrate the basics of Team Concept feature.
 Now that security is enabled I can create some sample users. To do this, I click on Manage Hudson again in the sidebar, having saved the security changes, and select Manage Users. I’ll go ahead and create a small set of users, Duncan, Winston, Bob, Geoff and Latha using the Create User link:

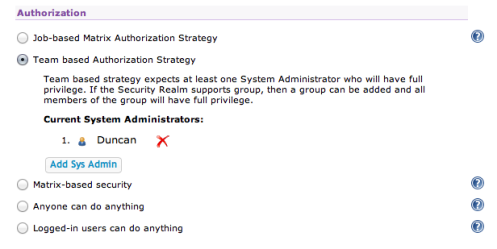
So now back to the Configure Security screen, you’ll see that by default, in the Authorization section, the option is set to the default Anyone can do anything. This option basically means that users don’t even have to log in to manage Hudson which is not what we want. Now I could of course just switch on one of the other traditional Hudson options here such as Job based security, but this is an article about Team concept so I’ll choose Team-based Authorization Strategy.
When using Teams the first thing you’ll need to do is to assign a user as System Administrator. This is a super-user who manages the teams as a whole and can see everything. Generally you’d have a specialist user for this role but for the sake of example, I’ll add myself:
Having saved that you’ll notice that the Hudson home screen has now changed, the New Job option and Manage Hudson option have disappeared from the sidebar. That’s because I’ve now got an authorization policy in place but of course I’m still not logged in.
At this point if I logged in as any user other than Duncan I’d still not see the New Job or Manage Hudson entries, Why? Well, so far I’ve only defined Duncan as the super-user and no-one else is assigned to a team yet, until they are assigned their privileges are restricted. Logging in as Duncan I can now see the expected sidebar options plus a new one Manage Teams.
Choosing Manage Teams I can go ahead and start to create some, in this case I’ll create two teams called Dev and QA respectively:

You’ll notice that apart from the obvious name and description you also have the ability to define a custom team folder. This is the location on the server in which the team’s jobs and builds will be stored. If you leave this blank then the team gets a folder under /teams in the HUDSON_HOME, e.g $HUDSON_HOME/teams/Dev. The purpose of this option is, again, to help sites sandbox teams and manage resources. You may choose to allocate different team folders to different storage volumes etc.
Once a team is created you can add members to it using the Add New Member button.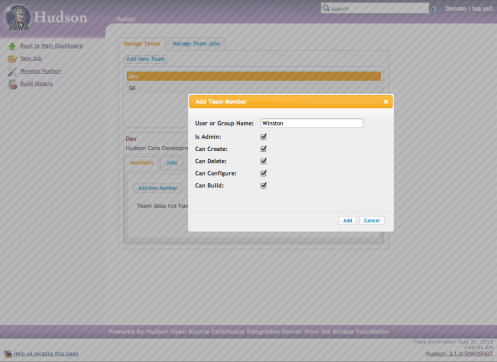
Here, I’ve added Winston as a Team Member. By checking the Is Admin option, Winston will now be able to manage this team from here on in. The other options are self explanatory.
Still logged in as Duncan, the super-user, I’ll assign Latha as a user and administrator for the QA team as well, save and then log out.
Great, so I now have two teams and an administrator for each. Now I’ll log in as Winston and start to manage the Dev team.
Logged in as Winston, I still can’t see the Manage Hudson option in the sidebar because Winston is not the super-user, however, I can see New Job and Manage Team. As Winston if I click New Job and create Job2 this will be the result:

As you can see here we have jobs called Job1 and Dev.Job2. Remember Job1? We created that before switching the Team support on. As such, Job1 is now treated as a PUBLIC job that anyone can view. Public jobs like this can only be managed and run by the super-user. I’ll explore in a later article how you might copy such a job into a team’s private job list.
The job “Job2”, that I created as Winston, appears in the list as Dev.Job2. This is because the job is owned by the Dev team and we use the team prefix to identify this. If I where to logout and login as say Latha, I’d still see the public job Job1 but not Dev.Job2 because she’s not in the Dev team. Team prefixes are important, once you’ve created jobs in teams URLs used for things like the REST API will all use this prefix as well as the job name.
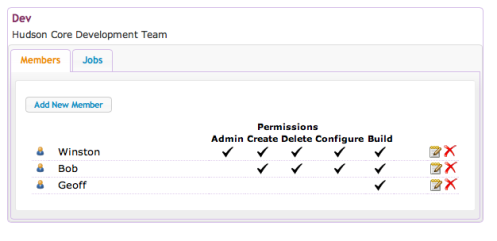
As Winston, I now go into Manage Teams and add some more members to my team with different privileges:
 I can also login as Latha and add a member to her team:
Notice how Geoff is in both teams with different access rights in each case. If I create another job as Latha in the QA team e.g QA.Job3,, Geoff will be able to see and run that, as well as being able to run (but not manage) the Dev.Job2. If a user is a member of more than one team and is able to create jobs in more than one of them then they can specify which team context to create it in. If they do not specify a team when creating the job then Hudson will default it to the first suitable team that they are a member of and have the correct privileges on.
So that’s the basics of team allocation, the last thing to look at in this introductory article is Job visibility.
So far we have seen that jobs are private to a team and invisible outside of the team, unless they have been created by the super-user. However, a team administrator is able to change this through the Manage Team > Jobs screen by choosing the Configure Visibility option: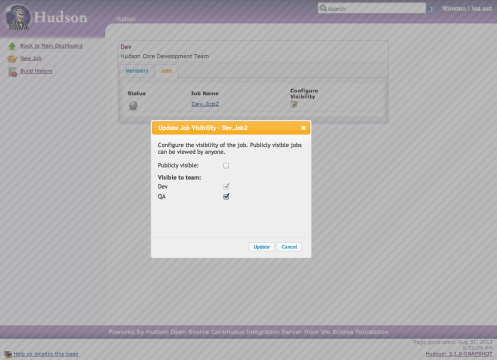
In this case, as Winston, I’ve made Dev.Job2 specifically visible to the QA team. I could also have made it public for all to see. In both cases, the viewer will see the job with the Dev team prefix (unlike a super-user public job which has no prefix) . In either case, the job is visible by the designated group, however, it’s not runnable. If you need a user to be able to run or manage the job then they need to be added to the base team with the correct privileges.
That leads us neatly to the topic of the next article in the series which discusses how we can simplify the management of these teams using user roles inherited from your existing authentication providers.
Published today the early access release of Hudson 3.1.0. This version adds a key new feature in team support and huge improvements in scalability. We’ll publish more information about both of these and some of the other changes over the next few weeks. As a preview, an outline of the themes for this release can be found in the Hudson project plan page at Eclipse. The key new feature “Team Concept” is documented on the Hudson Wiki Team Concept page. Please give this release a trial run on your testing environments and feed back any issues that you see via the Forum or developer list.
Download this release candidate from the Hudson Download Page and give it a go in your testing environments.
If all testing goes well we’re hoping to promote 3.1.0 to production in early September.
As part of this release we’d also like to welcome Bob Foster onto the project as a formal Committer. Bob has been contributing to Hudson for a good while now, so it’s great to have his contribution recognized. Welcome Bob!
Although 3.0.1 will only be a patch-set with bug fixes rather than any major changes we are proposing to inject a few small and non-disruptive UI changes into the release. These are in response to requests from a couple of different users and were simple and quick to do.
Here’s a screenshot of a build incorporating the changes:

You should be able to spot three distinct changes here but I’ll enumerate them for you:
- Most obvious is the new Powered By banner at the foot of the page. Just some improved branding for the project really.
- Next there is what I’ve termed the Privacy Message. In this case you can see it in the page footer containing the text “Confidential, Internal Use Only”. Many large organizations using Hudson have asked for this. On internal commercial systems there are often requirements to badge screens with privacy or confidentiality statements (or even copyright). This is a new configuration option is accessible through the Manage Hudson > Configure System screen and basically provides you with a place similar to the System Message, where you can place whatever text you like, including markup. So you don’t have to talk about “evil” things in the Privacy Message, you can put and create links to whatever you like and it will be printed at the base of each page. I’ve seen several systems where the System Message is being used for information links and similar which would be better consigned to the bottom of the page, now you can do that.
- Finally the new Instance Tag feature. Again, just set through the Configure System screen, the instance tag is an arbitrary name or tag that you can associate with an install. It’s function is to help overworked sysadmins who have many Hudson instances to manage and want to know at a glance which system they are currently working with without having to look at and mentally decode the URL. To help them, the Instance Tag is printed in the Page Header, Footer and on the browser tab/window label. In my example here the Tag is set to “DEV_CI_I”. As I said though, the actual string is is arbitrary and optional. Unlike the Privacy Message, markup is ignored in this value.
Both Instance Tag and Privacy Message are optional and if you don’t define them then your UI will remain as it is today in Hudson 3.0.0 except for the new banner.
Note that the Instance Tag and the Privacy Message have not been exposed through the REST API yet. It probably makes sense to do so at some point if there is interest.
Any feedback on this new feature? Just post on the forum or mail the Dev list quoting this article.
We’re pleased to announce the availability of the new Hudson Mobile Monitor application in iTunes.

And, here are a couple of screenshots from within the app:


This first version is a simple application which allows you to monitor, at a glance, the state of your various servers and jobs from your iPhone/iPod.
Right now the application is limited to read-only browsing of the servers and will work with unsecured servers only, however, over time I’ll be adding the extra functionality required to take it to the next level. Under the covers this is using the Hudson REST API to do the talking with the server, so to use this on your server you’ll need the REST plugin installed and enabled. The REST API has some limitations at the moment such as an inability to filter on views, but once we have that then this feature can be added to the app as well.
From a coding point of view, the app is written in Java and HTML5 using Oracle’s Oracle Application Development Framework Mobile extensions – ADF Mobile. The cool thing there is that the app will run unchanged, with the possible exception of some artwork sizing changes on Android as well. It’s on the to-do list…
Also on the to-do list (in the interest of full disclosure)
- Tablets – yes it will work on the iPad but it does not take full advantage of the extra space, likewise I need to get hold of an Android tablet to play with and test
- Better support for reconnect in case of network failure. Right now you may have to kill and restart the app if it gets stuck
- Cache support – everything is queried in real-time right now and certainly improvements can be made in the area of caching and lazy loading of the job list
Anyway I’m pretty pleased with this as the first cut, have a play and let me know what you think
Duncan
For those of you watching the various keynotes and general sessions at Oracle OpenWorld this week, the Oracle cloud strategy should be pretty evident. For the Hudson team it was an exciting event, specifically because of the new Oracle Developer Cloud Service. At the heart of this cloud offering for developers is Hudson providing all the CI goodness required by today’s developers. At a technical level (to be more specific), Oracle are using Hudson 3.0 Release Candidate 3, but they will upgrade to production when that arrives shortly. Hudson is matched with GIT, Maven, Wiki and task tracking for a neat and compelling developer platform, particularly when paired with Mylyn for enhanced IDE integration.
The Oracle Developer Cloud Service takes advantage of Hudson’s pluggable update centre capability to control the list of plugins available on the hosted platform
Exciting times indeed, we’ll be keeping an eye on this story as it evolves.
